PowerShell 101 – Introduction to task automation

I was planning to continue the topic of workspace migration to a different region, but the next article in the series will contain some PowerShell script. That’s why we will start with brief introduction to this tool.

What is PowerShell

PowerShell is a task automation and configuration management framework solution. It consists of a command-line shell and a scripting language. A command-line shell is simply a text-based interface that allow us to run commands, which in PowerShell are called cmdlets (commandlets). Cmdlets allow us to run variety of actions, that can be semi-automated, where User runs the code manually on ad-hoc basis, or fully automated using Windows Task Scheduler or Azure Automation.
 
A PowerShell Scripting Language is built on .NET (for the new version and .NET Framework for Windows only versions). This means in a nutshell, that instead of operating only text values, all inputs and outputs in PowerShell are .NET objects – structured objects with methods and properties, that allow manipulate and filter data. Which makes PowerShell a full-blown programming language, rather just a simple text interface. As an example, if you go to command prompt (“Windows + R” and type “cmd.exe”) and provide tasklist as input, you will get the list of all tasks running on your machine at the moment. Output is a plain text and if you want to get only part of this information, you must parse it manually. On the other hand, in PowerShell you could type the following command (don’t worry for now, I will break it down later):
# Filter tasks where CPU usage is greater than 100s
Get-Process | Where-Object { $_.CPU -gt 100 }
This command allows to display only the list of tasks, where CPU running time (since the task started) is higher than 100 seconds. This very easy example but already shows the difference between PowerShell and simple text input/output communication like in command prompt.
 

How to install PowerShell

You can visit Microsoft Documentation for detailed instructions. For Windows clients Microsoft recommends using winget, which is another command-line tool dedicated to application management. If you prefer to run installation in more standard way, you can download the msi package:
 
Figure 1. Download MSI Package for PowerShell.
The thing is that 7.5 version wasn’t working well for me and I needed to install the PowerShell 7.4.7. Luckily, on the of the document page we have a box showing last 3 versions (at the time of this article):
 
Figure 2. Choose PowerShell version you wish to install.
If you need different version, you can navigate to GitHub using the links, scroll down and find the type of installation you want to download. Now, important part is what you can see here in the screenshot. Let’s start with the version at the bottom – Preview release. This is not something you would like to use for your production code. If you fallen in love with PowerShell, and you wish to test features and provide feedback – this release is for you. Otherwise, it’s not recommended to use it. Now, let’s see the other two options:
  • Stable release – Current release that contains latest (tested) features and bug fixes. It gets frequent updates and has shorter lifespan (I will explain what it means below).
  • LTS release – Long Term Support release is not updated with latest features that frequently and is supported for longer time than stable release (3 years vs 18 months).

If you use for example Azure Automation and create Runbooks with PowerShell script, you must decide what will be the PowerShell version used to run them. If version is no longer supported – your scripts will fail. That is why it is important for you decide what’s more important. Access to latest features or having your scripts operation for longer period of time. For me I go with LTS and that’s my recommendation for any Power BI Admin tasks. The reason I am going through this is because it’s tempting to always pick the highest version available, but in this case it’s not necessarily the best choice.


Once you have your PowerShell installed, to be able to work with Power BI Cmdlets you must install specific packages in PowerShell. You can refer again to Microsoft Documentation to see the list of all available modules. We have modules dedicated to Amin tasks, to Capacities management, Reports, etc. However, one module is enough to install all of them. Please, bear in mind that you must open PowerShell as Admin to install anything on your machine. You can open PowerShell and type following command:

Install-Module -Name MicrosoftPowerBIMgmt -Scope CurrentUser

It may happen that you will not be allowed to install any modules, even as Admin. This may happen due to specific Execution Policies in your system. In this case, you will see an error like this:


PowerShell Execution Policy Error
Figure 3. PowerShell Execution Policy Error.

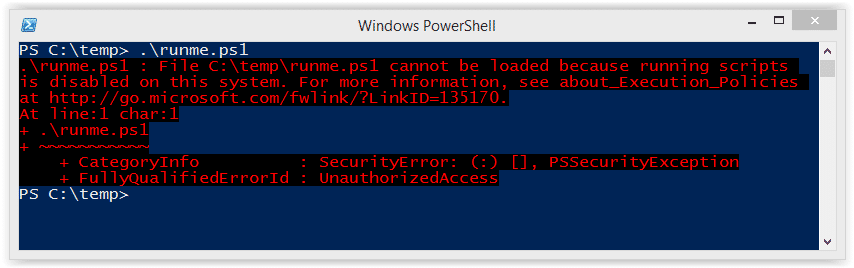
Execution Policies help to protect you from untrusted code. However, in this particular case it’s safe to run the module installation. To bypass this setup, you can run the following commands:

# Get your current ExecutionPolicy
$originalPolicy = Get-ExecutionPolicy
# Alternatively, you can display it in consolder, just uncomment the line below:
# Write-Host "Original Execution Policy: $originalPolicy"

# We set the new policy as Unrestricted. "Process" scope means that this will be applicable only to the current session of PowerShell.
Set-ExecutionPolicy Unrestricted -Scope Process -Force

# Install Power BI Module
Install-Module -Name MicrosoftPowerBIMgmt -Scope CurrentUser

# If you want to bring back the previous ExecutionPolicy still in the current session, uncomment the line below:
# Set-ExecutionPolicy $originalPolicy -Scope Process -Force

One more important thing to mention when it comes to Power BI Cmdlets is authentication. PowerShell must be aware of your access rights in Power BI Service, that’s why to run any command you must first login using: Connect-PowerBIServiceAccount command.

With this setup you should be good to go. Now, let’s see different options you have to run the PowerShell scripts.


PowerShell IDEs

Well, two options we have by default in Windows, they are not really an Integrated Development Environments. They simply allow to run the commands:
 
  • PowerShell Console
  • PowerShell ISE

PowerShell ISE (Integrated Scripting Environment) is already a better choice than standard console. It allows to easier handle multiline scripts, allows to quicky access all available cmdlets and has IntelliSense support. But still, this is not the best choice as it’s even no longer developed now. This is why Microsoft recommends using PowerShell extension for Visual Studio Code.

Here is detailed documentation of the extension and its features. Among them, the most important are:

  • Syntax highlighting
  • Re-usable code snippets (own, built-in or from marketplace)
  • Find Reference of your variables, classes, etc.
  • Go to definition of your variables, classes, etc.
  • Ritch debugging capabilities
  • Run only selected code in terminal
  • and many more

For those of your who love standard PowerShell ISE experience, VS Code extension even has the ISE based theme available for you 🙂

Not to mention that whatever code you are going to develop, you would probably like to store it in GitHub or Azure DevOps, and VS Code is just perfect for this as well.

Once we have everything we need, let’s look at the PowerShell syntax!


Objects, Properties and Methods

PowerShell is an object-oriented programming language. Whatever is processed by PowerShell is a .NET object rather than just a plain text. Therefore, if we run a simple command like Get-PowerBICapacity what is returned is not text, but a structured object, that contains its own properties and methods:
 
  • Properties – attributes of an object (like Name, Id)
  • Methods – actions you can perform on your object
If you would like to know what the properties and methods are available for your object, you must follow it with “pipe” symbol (“|”) and “Get-Member”, like this:
# Opens Web Browser to login to Power BI Service
Connect-PowerBIServiceAccount

# Get available properties and methods for Get-PowerBICapacity object
# Input is formatted as a table
Get-PowerBICapacity | Get-Member | Format-Table -AutoSize

This brings the following result:

Power BI PowerShell: Members of PowerBICapacity object.
Figure 4. Members of PowerBICapacity object.

Here we can clearly see what are the available properties and methods for the given object. On top of that, at the end of each property you may have noticed additional info in curly brackets: {get; set;}. This indicates if specific property is available only for read, write or both operations. If you need more details on specific method, you must slightly modify the code to ask for that method: Get-PowerBICapacity | Get-Member -Name “Equals” | Format-List. If find list is more convenient formatting in this case. It will provide us the following details:


Power BI PowerShell: Details of "Equals" method.
Figure 5. Details of “Equals” method.

In the Definition we see what type of value is returned (in this case it’s Boolean) and what type of argument it requires (in this case it’s another object to compare). It would be amazing if this kind of documentation would be supported by at least one example, but it’s still better than nothing.


Variables

A variable is a named container to store values / objects and re-use them later in the code. To declar and call the variable you need prefix variable name with “$“.
# Declare your variables:
$FirstName = "Pawel"
$LastName = "Wrona"

# Use variables:
$FullName = "$FirstName $LastName" # Concatenation

# Display variable:
$FullName

When variable is assigned, PowerShell assumes proper data type, and usually this assumption is correct. You can run the code below to see if the data types displayed for each of the 3 variables is as per your assumption. Alternatively, the code below shows alternative approach, where data type is explicitly defined. Please, note that we are using new cmdlet here to display data types: Write-Host. This allows us to display text in terminal, and we can use different color coding. This could prove useful when you develop larger script, and you would like to “communicate” with your script by displaying some text in terminal. You can use the color coding to differentiate the types of output between information, alert, success or fail messages.

# Declare variables
$Name = "Pawel"
$Age = 38
$IsAdmin = $true

# Print data types in terminal using different colors
Write-Host "Name variable type: $($Name.GetType().Name)" -ForegroundColor Green
Write-Host "Age variable type: $($Age.GetType().Name)" -ForegroundColor Yellow
Write-Host "IsAdmin variable type: $($IsAdmin.GetType().Name)" -ForegroundColor Red

# Alternatively explicitly define data types
[string]$Name = "Pawel"
[int]$Age = 38
[bool]$IsAdmin = $true

Variables can be used also to assign objects. In our previous example we used cmdlet Get-PowerBICapacity to further get the list of available properties and methods. Below example shows exactly the same procedure but first assigns the Capacities object to a variable.

# Assign output object to $Capacities variable
$Capacities = Get-PowerBICapacity

# Use object
$Capacities | Get-Member | Format-Table -AutoSize

Operators

In PowerShell we will not find standard operators like “=, >, <, >=, <=” etc. For those of you who had a chance to work with OData protocol, PowerShell operators are similar.
  1. Comparison operators:
    1. -eq: Equal to
    2. -ne: Not equal to
    3. -gt: Greater than
    4. -lt: Less than
    5. -ge: Great than or equal to
    6. -le: Less than or equal to
  2. Logical operators:
    1. -and: Returns true if both conditions are True
    2. -or: Returns true if at least one condition is True
    3. -xor: Returns true when one conditions is True and the other is False
    4. -not: Inverts the Boolean value
Of course, there is more than that, but these are the most important ones. Please find below examples of this code in use:
# Equal to / Not equal to
5 -eq 5     # True
5 -ne 5     # False

# Grater than / Less than
3 -gt 2     # True
3 -lt 2     # False

# Grater than or equal to / Less than or equal to
3 -ge 3     # True
3 -le 5     # True


# AND, OR, XOR, NOT
$true -and $true    # True
$true -or $false    # True
$true -xor $false   # True
-not ($true)        # False

Conditional statements

You can use conditional statements in PowerShell to support decision making in your code and activate specific branch of code based on different conditions. PowerShell also support switch statements, but I will focus only on if statement today. You can use if, if-else or if-elseif-else statements:
$IsAdmin = $true
$IsNice = $true

# IF
if ($IsAdmin -eq $true){
    Write-Host "Pawel is an Admin."
}

# IF-ELSE
if ($IsAdmin -eq $true){
    Write-Host "Pawel is an Admin."
}
else{
    Write-Host "Pawel is not an Admin."
}

# IF-ELSEIF-ELSE
if ($IsAdmin -eq $true){
    Write-Host "Pawel is an Admin."
}
elseif ($IsNice = $true) {
    Write-Host "Pawel is not Admin, but at least he is nice."
}
else{
    Write-Host "Pawel is not an Admin and he is rude."
}

Loops

Loops are structures that allow to execute a given block of code multiple times, based on defined conditions. PowerShell supports many types of loops, and we will not cover all of them in this introductory article. I will list all of them and cover few with the demo. Available loops in PowerShell:
  • for – you decide how many times loop will be executed
  • foreach – specific case of for loop, which iterates through a collection of items (lists, arrays)
  • while – runs a block of code while specified condition is true
  • do while – similar as while, but guarantees that code will be executed at least once
  • do until – reversed while, but runs the code until specified condition is true
  • foreach-object – runs through all items in given object
We will have a closer look at for, foreach and foreach-object loops.
# FOR LOOP
# First argument is initial state
# Second argument is a condition to stop the loop. Last execution is when i = 5
# Thrid argument is an increment logic for your control parameter: after each loop value of i increase by 1
for ($i=1; $i -le 5; $i++){
    Write-Host $i
}

# FOREACH LOOP
# Requires a collection to iterate through
# Starts with first item in collection and ends up with last one
# Current Item name can be anything you want (here it's simply $number)
$numbers = @(1, 2, 3, 4, 5)
foreach ($number in $numbers){
    Write-Host $number
}

If you run these two loops, you will quickly notice that they produce exact same output. Let’s look at the last for loop variant – foreach-object. Why is this one important? It allows us to work with collections of items returned as output of cmdlets, by just using the “pipe” symbol (more on that in the next section). Looking at our example of foreach loop and collection of numbers, we can run the loop using foreach-object like this:

$Numbers = @(1, 2, 3, 4, 5)

# $_ stands for current item in the loop
$Numbers | ForEach-Object{
    Write-Host $_
}

Unlike in foreach loop, where we needed to give the name for the current item in the loop ($number in $numbers), with foreach-object we can’t do this. Therefore, we deal here with “$_” which is called a pipeline variable or automatic variable. When foreach-object is used, PowerShell automatically assigns the current item in the loop to that variable. We can use it as any other item in standard collection and do the “dot walk” by adding methods and properties to the expression:

# Calling this cmdlet will display following values in terminal:
# String, Int32, Boolean

$Items = @("Pawel", 38, $true)

$Items | ForEach-Object{
    Write-Host $_.GetType().Name
}

In PowerShell you will always work with objects, that’s why cmdlets like “Foreach-Object” or “Where-Object” are very important, as they allow to leverage the flagship feature of PowerShell which is Object-Based Pipeline Processing.


Pipeline Processing

Or simply “piping” is a mechanism in PowerShell that allows to perform multiple operations in a single expression (a one-liner). It works in a way which takes output object from one cmdlet and passes it to another one as argument, just by using the “pipe” symbol. It helps to avoid too many repetitions in your code, creating unnecessary variables, improves readability of your code (when used in smart way) and sometimes even can boost the performance. Let’s have a look at slightly modified code we already used today. We will try to get the list of active tasks on our machine, take first 5 with biggest CPU consumption and display their Name and CPU usage:
# Step 1: Get all processes
$allProcesses = Get-Process

# Step 2: Convert to an array
$processArray = @()
foreach ($proc in $allProcesses) {
    $processArray += $proc
}

# Step 3: Sort the array
for ($i = 0; $i -lt $processArray.Count; $i++) {
    for ($j = $i + 1; $j -lt $processArray.Count; $j++) {
        if ($processArray[$i].CPU -lt $processArray[$j].CPU) {
            $temp = $processArray[$i]
            $processArray[$i] = $processArray[$j]
            $processArray[$j] = $temp
        }
    }
}

# Step 4: Select first 5 processes
$topProcesses = @()
for ($k = 0; $k -lt 5 -and $k -lt $processArray.Count; $k++) {
    $topProcesses += $processArray[$k]
}

# Step 5: Display results
foreach ($process in $topProcesses) {
    Write-Output "Process: $($process.Name) | CPU: $($process.CPU)"
}

Don’t focus now on the code and don’t worry if you don’t understand it. The purpose here is to show how long this code is when it’s written without pipeline processing, and how crisp it can be when pipeline processing is used:

Get-Process | Sort-Object CPU -Descending | Select-Object -First 5 Name, CPU

You must admit that the difference is spectacular. Starting point is similar, we Get-Processes as step 1. Step 2 is not needed here, as we can directly sort the objects returned by Get-Processes (Step 3). Step 4 and Step 5 are done together by using Select-Object cmdlet. Instead of sorting operation and keeping only first 5, we could filter the collection using Where-Object to return only those items, where CPU Consumptions is higher than 1500 seconds:

Get-Process | Where-Object { $_.CPU -gt 1500 } | Select-Object Name, CPU

Where-Object is also an iterator just as Foreach-Object, and we can see it thanks to the current item operator: $_. We expand the objects property – CPU, we use the comparison operator (-gt), pipelines and object selection. With this single line of code, we used almost what we’ve learned today.


Conclusion

PowerShell is a powerful and interesting scripting language, that’s definitely worth spending some time and learning it. It is widely used for system task automation in local shell on your machine, in cloud shell like Azure to manage infrastructure or SharePoint to manage resources. It allows to handle Power BI Administrative tasks through set of out-of-the-box cmdlets, as well as a Swiss army knife – cmdlet that allows to invoke any Power BI REST API.
 
I hope this article was useful and it will help you to understand better any PowerShell code presented here. As always, thank you for reading and see you in the next article 🙂
Picture of Pawel Wrona

Pawel Wrona

Lead author and founder of the blog | Works as a Power BI Architect in global company | Passionate about Power BI and Microsoft Tech

Did you enjoy this article? Share with others :)

5 1 vote
Article Rating
Comments notifications
Notify of
guest
0 Comments
Oldest
Newest Most Voted
Inline Feedbacks
View all comments

Related Posts